In my previous post, I experimented with the new const keyword which you can use to create constants in JavaScript. Along with var and const, we’ll soon have a third way to declare values in JavaScript: the let keyword.
Like var, you’ll use let to create variables (not constants). You might be wondering why we need two ways to create variables. Well, let differs from var in one very important way: let is scoped differently from var. Let’s take a closer look at what that means.
Remember that as of ECMAScript 5, JavaScript has only two kinds of scope: global scope and function scope. That means a variable is either a global variable, visible everywhere in your code, or it’s a variable local to a function, visible everywhere in that function. This is mostly okay but has a subtle consequence: you can refer to variable before it’s defined without getting a reference error.
For instance, in the following code:
function pets() {
    var dog = "Fido";
    console.log("cat is ", cat);
    var cat = "Fluffy";
}
When you call pets() you’ll see:
> pets()
cat is  undefined
That means that the cat variable exists in the line above where you declare it! We know it exists because we don’t see a reference error.
Side note: to see a reference error, simply change the variable cat to zebra in the line where we are calling console.log:
function pets() {
    var dog = "Fido";
    console.log("cat is ", zebra);
    var cat = "Fluffy";
}

> pets()
Uncaught ReferenceError: zebra is not defined
In this example, the variable zebra really doesn’t exist at all, so we see the reference error.
What happens with var is something called hoisting. When you write code like our pets function above, the cat variable is hoisted, so it’s as if you wrote pets like this:
function pets() {
    var dog = "Fido";
    var cat;
    console.log("cat is ", cat);
    cat = "Fluffy";
}
Notice that the declaration of cat is moved up above where we’re using cat. It’s not being initialized, which is why we see undefined as the value for cat when we display it in the console, but because the declaration is above where we use it, we don’t get a reference error.
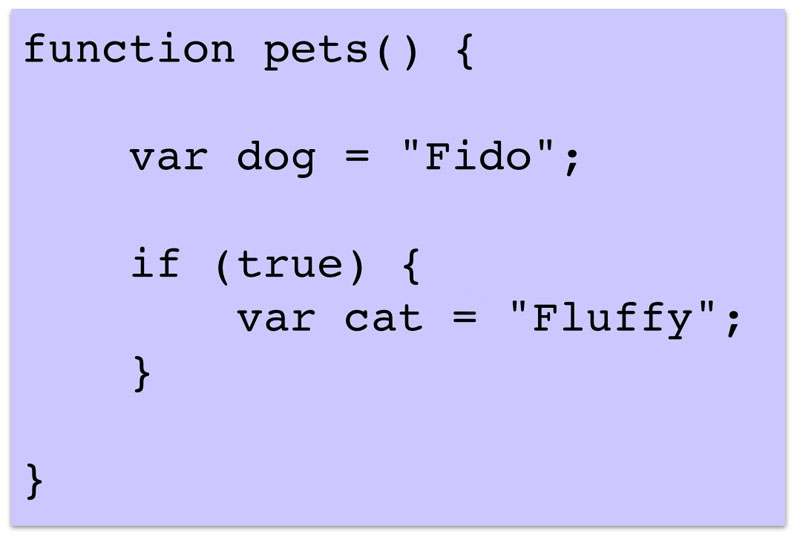
This hoisting happens even when you declare a variable within a block in a function, like this:
function pets() {
    var dog = "Fido";
    console.log("cat is ", cat);
    if (true) {
        var cat = "Fluffy";
    }
}
Call pets, and you’ll see exactly what we saw before, that cat is undefined. Weirder still, you’ll find that cat is declared even if the code where you declare it never gets executed at all:
function pets() {
    var dog = "Fido";
    console.log("cat is ", cat);
    if (false) {
        var cat = "Fluffy";
    }
}
Notice here that even though the if block is never executed, when we display the value of cat in the console, we get undefined and not a reference error.
This all happens because the scope of cat is the entire pets function. If you imagine a scope being like a rectangle you draw around the code that defines the scope, the scope of the variable cat looks like this:
That means that cat is declared and exists everywhere in function pets. Its value won’t be defined until you explicitly give it a value, but the variable exists. (Remember the difference between a declared variable and a defined variable: a declared variable has been declared with the var keyword, and a defined variable has been given a value other than undefined.)
let changes all this. With let, your variables are no longer declared before the flow of execution gets to the statement that declares them. So if you replace var with let in the first version of pets:
function pets() {
    var dog = "Fido";
    console.log("cat is ", cat);
    let cat = "Fluffy";
}
When you call pets(), now you’ll see (Firefox 36.0.4):
> pets()
ReferenceError: can't access lexical declaration 'cat'
                before initialization
In other words, the variable cat is not visible above where it is declared, like it was when we declared it with var. This behavior is a bit more intuitive (it’s weird to think of variables being declared above the statements that declare them), and it’s a lot easier to understand for programmers coming to JavaScript from other languages where this kind of scoping is the norm.
let also means we now get block scoping, too. With var, as you’ve seen, if a variable is declared inside block nested within a function, the scope of that variable is the entire function, even though you might more intuitively think that the scope of the variable should be limited to the block. That means you can access the value of cat after the block in which it’s declared and defined has completed executing:
function pets() {
    var dog = "Fido";
    if (true) {
        var cat = "Fluffy";
    }
    console.log("cat is ", cat);
}
Call pets and you’ll see:
> pets()
cat is  Fluffy
Again, this is because var has function scope, not block scope; a bit weird for anyone used to a language like, say, Java.
With let, the scope of the variable is limited to the block in which the variable is declared:
function pets() {
    var dog = "Fido";
    if (true) {
        let cat = "Fluffy";
        console.log("cat is (block):", cat);
    }
    console.log("cat is (function):", cat);
}
Call pets and you’ll see:
> pets()
cat is (block): Fluffy
ReferenceError: cat is not defined
Now, we cannot access the variable cat outside the block in which it’s declared; when we try, we get a reference error.
You can visualize the scope of cat declared with let like this:
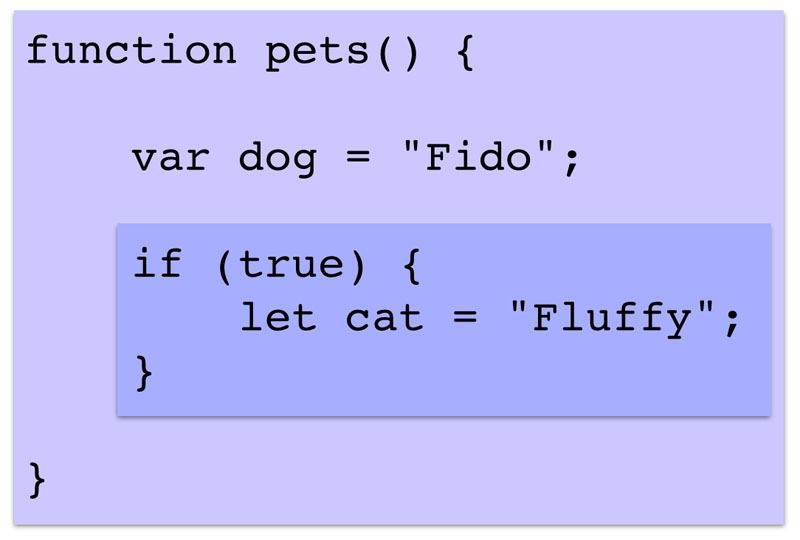
The scope of cat in this example is a box drawn around the if block, and this scope is nested inside the scope created by the pets function, which is the scope of the variable dog. (Finally, Fido gets a mention!)
So, two important things to remember about let so far are:
- When you declare a variable with
let, it does not exist until the line of code where you declare the variable is executed. - When you declare a variable with
letinside a nested block, that variable has block scope: it is not visible or accessible outside the block in which it is declared.
The way let works is a pretty fundamental change about the way variables work in JavaScript (although note that var is not going away! We don’t want to break the web…). Now, you might think it’s not that big of a deal, but let has quite a few implications, from the more obvious (the use cases we’ve looked at so far) to the more subtle.
For instance, let’s take a look at using let with a for loop:
function pets(dogs, cats) {
    for (var i = 0; i < dogs.length; i++) {
        console.log("Dog:", dogs[i]);
    }
    console.log("i is:", i);

    for (let j = 0; j < cats.length; j++) {
        console.log("Cat:", cats[j]);
    }
    console.log("j is:", j);
}
In the first for loop, we’re declaring a variable i to use as the loop variable. But as you might guess, the scope of i is the entire function, not just the for loop because we’re declaring it with var. That means i is accessible after the for loop block has completed.
In the second for loop, we’re declaring a variable j to use as the loop variable, but this time we’re using let, so the scope of j is limited to the for loop itself. Let’s test that out:
> pets(["Fido", "Spot"], ["Fluffy", "Pickles"]);
Dog: Fido
Dog: Spot
i is: 2
Cat: Fluffy
Cat: Pickles
ReferenceError: j is not defined
So where we attempt to display the value of j after the loop block has completed, we get a reference error.
Using var or let in a short loop block like this doesn’t make much of a difference most of the time (unless you’re counting on using a loop variable, like i outside of the loop block, which would be a bad idea in general), but let’s take a look at an example where this makes a big difference:
window.onload = function() {
    var button = document.getElementById("button");
    button.onclick = function() {
        var body = document.querySelector("body");
        for (var i = 0; i < 3; i++) {
            var div = document.createElement("div");
            div.id = "div" + i;
            div.innerHTML = "This is div " + i;
            div.onclick = function() {
                console.log("You just clicked div " + i);
            };
            body.appendChild(div);
        }
    };
};
(If you’d like to try this code, you can download it from github along with the HTML and load it into your browser.)
This version of the code uses var. When you run this code, you’ll see a web page with a button “click me”. When you click the button, you’ll see three <div> elements appear:
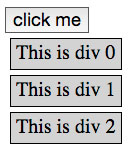
Now try clicking on each <div> element. You will see the same message in the console each time:
You just clicked div 3
I’ll quickly walk through the code, and then we’ll change the var to let so you can see the difference:
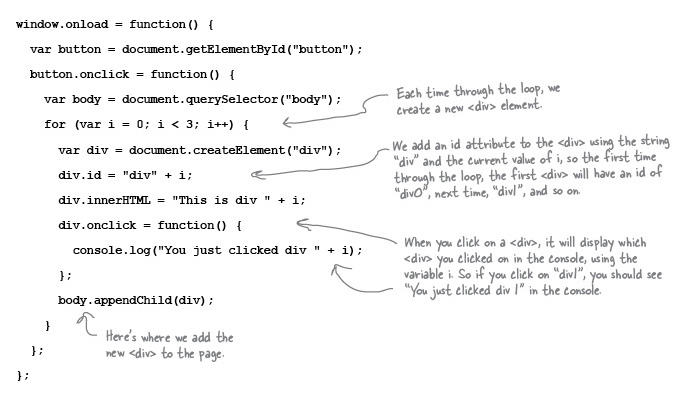
First, we set up a click handler for the <button> in the page with the id “button”. We then use a for loop to create three new <div> elements, and add each to the page by appending it to the <body> element, which just adds each new <div> to the bottom of the page. We give each <div> an id based on the string “div” and the current value of i, so the first time through the loop, the new <div> we create has the id “div0”; the second time through the loop the new <div> we create has the id “div1” and so on. We also use the value of i to set the text of the <div> which you can see in each <div> on the page. All that works fine.
We also set up a click handler for each <div> element, so that when you click on a <div> it should display “You just clicked div ” and then a number depending on which <div> you clicked on. So if you click on the <div> with the id “div0”, you would expect to see “You just clicked on div 0” in the console; for “div1”, you’d expect to see “You just clicked on div 1”, and so on.
If you remember closures from Chapter 11 of Head First JavaScript Programming, you might remember that when you create a click handler for an element object that contains a free variable, you create a closure. A closure is a function with an environment containing the value of any free variable in the function; that is, a variable that’s not defined in the function itself, but rather in the scope surrounding the function when that function is created. So if you look at this example, you can see that each time through the loop, we’re creating a function that is the click handler for the <div> object that we’re creating in that loop, and that function has a free variable, i. i is the loop variable and it’s defined in the scope surrounding the function when we create it. That means that each click handler is actually a closure: a function plus an environment, with the environment containing the value of i. So, later, when you click on one of the <div>s in the page, and invoke the click handler, the click handler function will find a value for i in the environment that is part of its closure.
So, why doesn’t this work? Why do we see “You just clicked on div 3” no matter which <div> we click on? The problem is that each closure has a reference to an environment, and because i has function scope, the environment for all three of the closures is the same! The environment is the function scope. Here’s what that looks like:
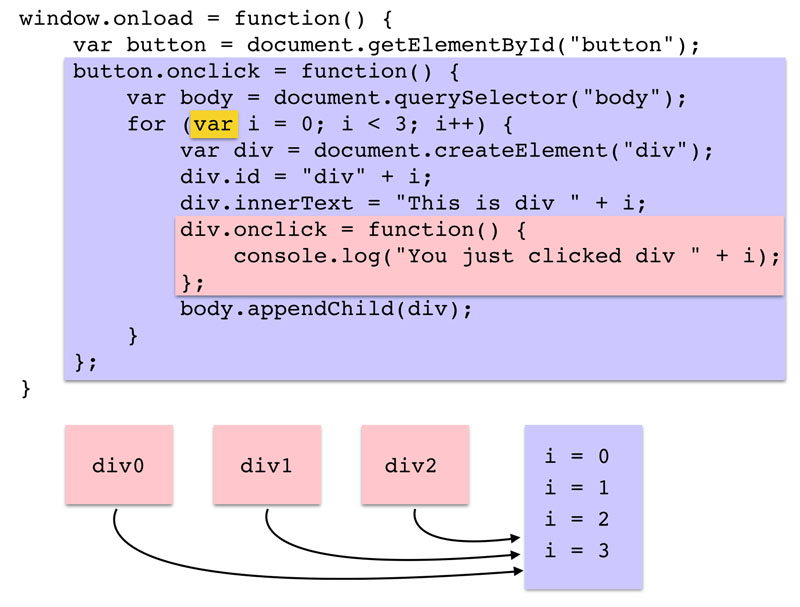
Each of the pink boxes is a click handler function with a reference to an environment shown as the purple box. The environment is one environment that corresponds with the scope of the function, because that is the scope of the variable i. Each time through the loop, the value of i changes, and it changes in the environment too. So when the loop completes and the onload function is done, the value of i in the environment that all three closures reference is 3. When you click on any of the <div> elements in the page, you’ll invoke that element’s click handler, which references the value of i. Since i was a free variable when the function was created, the value of i is looked up in the environment for that click handler (the same environment for all three click handlers!) and its value is 3. So all you ever see is “You just clicked on div 3.”
Now let’s look at what happens if we change from var to let when we declare i:
window.onload = function() {
    var button = document.getElementById("button");
    button.onclick = function() {
        var body = document.querySelector("body");
        for (let i = 0; i < 3; i++) {
            var div = document.createElement("div");
            div.id = "div" + i;
            div.innerHTML = "This is div " + i;
            div.onclick = function() {
                console.log("You just clicked div " + i);
            };
            body.appendChild(div);
        }
    };
};
Make this change and reload the page and click on the button. The page will look exactly the same: you’ll see three <div> elements appear, with ids “div0”, “div1”, and “div2”. But, now click on each of the <div>s and you should see three different messages in the console:
You just clicked div 0
You just clicked div 1
You just clicked div 2
(To try this yourself get the code from github).
Now, the code is working perfectly! One small change makes all the difference in the world… So how does it work?
The trick is that because let creates block scope in the for loop, each time we go through the loop a new scope is created. That means, each time you create a new closure with the click handler for each new <div> object, a different environment for the closure is created, and each environment has a different value for i:
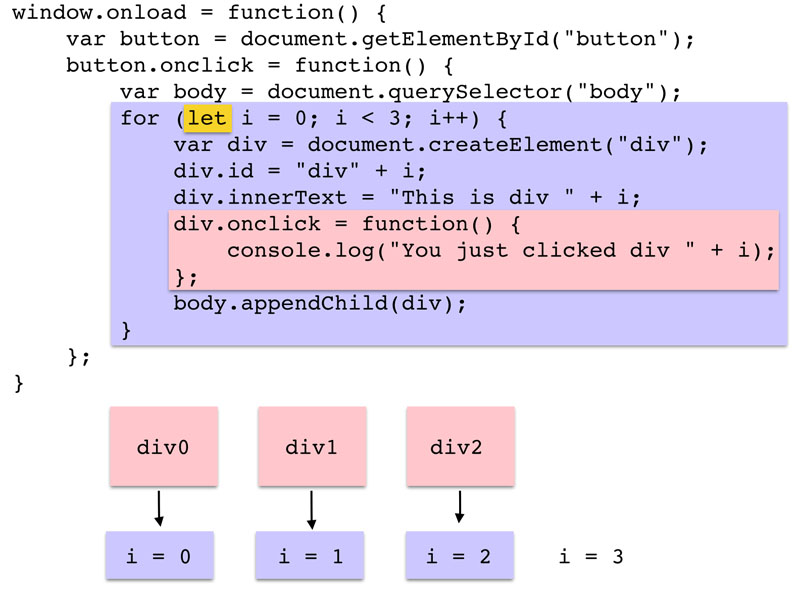
So, when you click on a <div> element in the page, the value of the free variable i is looked up in the closure, and this time, it’s correct. It’s correct because each closure captures the individual block scope that was created for that one time through the loop.
Now, sometimes you might want the environment for the closures you create in a function to be shared, like when we used var to declare i, but sometimes you’ll want each closure to have a separate environment, like when we used let to declare i. Now you know how var and let work, and how closures work, you’ll be able to make an informed choice! And, just to link back to the previous post again, note that const is scoped the same way as let.
Keep in mind that let is not fully supported in browsers yet (as of this writing). Keep your eye on the ECMAScript 6 compatibility table for browser support in the future, and in the mean time you can use a transpiler, like Traceur to translate your code that uses let to ECMAScript 5 code that simulates let (and does so remarkably well!). To use Traceur, all you have to do is link to it in the <head> of your document. Check out the code for the let example on github to see how to do this.
Resources
- Chapters One and Eleven of Head First JavaScript Programming
- ECMAScript 6 compatibility table
- Mozilla’s copy of the working draft of the ECMAScript 6 specification
- Traceur transpiler which converts ES6 code into ES5 code for some features (not all)
- If you need a refresher on how to use the browser console, read this post

Thanks for the links. Let is new for me; first time I heard of it in JS. 🙂