
In a previous post, I mentioned that Twitter is changing their API so that all requests to the API will now require authentication. Unfortunately, what this means is that you can no longer use JSONP to request timeline and search data from Twitter (which we showed you how to do in Chapter 7 of Head First HTML5 Programming). Instead, you will need to use a proxy: a piece of software that sits between the JavaScript code in your web page, and the Twitter API, and creates an authenticated request to Twitter so you can get the data you want.
For beginners, this probably sounds fairly daunting! But it’s actually not as bad as it sounds, because there are a number of free libraries you can use to build your proxy. I’ve taken a look at a few of these, and found one, tmhOAuth, that is easy to use, and is built with PHP, which you may have on your computer already.
Let’s build a small web application that you can use to search for a word on Twitter and get the tweets back in JSON format. Here are the steps we’re going to follow to create this app:
- Get a web server and PHP running on your computer
- Create a Twitter application on Twitter that you can use to connect
- Download and install the tmhOAuth PHP Library
- Write a PHP proxy application to connect to Twitter
- Create an HTML page with JavaScript code to connect to the proxy, retrieve the tweets, and display them in the web page
Get a web server and PHP running
To get started, you’ll need to make sure you’re running a web server on your computer (we describe how to do this on page 231 of Head First HTML5 Programming) and also that it’s running PHP. The easiest way to verify if you’re running PHP is to create a small file, index.php containing the following code:
<?php phpinfo(); ?>
Save this in a directory where your web server can see it (for instance, if you’re on a mac, that will be somewhere in your ~/Sites/ directory), and then go to the path to load the file. So, if you save index.php in ~/Sites/Twitter/ you’ll go to http://localhost/~YOURUSERNAME/Twitter/index.php to test. If you see output that looks like this at the top of the page:
![]()
then you’ve got PHP running! Note that the version of PHP you are running might be different but as long as it’s 5 or greater you’re fine. If you’re on a Mac, chances are you are already running a web server with PHP and you won’t have to do anything. If you’re on Windows, you might have to install PHP and get it running; check out these instructions for more information on how to do that (note that you’ll need to make sure you have a web server running first, probably Apache or IIS). If you’re running Windows 7, check out this article which describes how to get PHP up and running in 5 steps.
Once you get PHP running, you’ll need to download tmhOAuth (click the ZIP button on the github project page). Save the zip in a folder where your web server can see it and where you’ll be creating this web application (again, if you’re on a Mac, this will probably be somewhere in the ~/Sites/ folder). Unzip the folder (if it isn’t done automatically for you), and you should have a folder named tmhOAuth-master.
Create a Twitter application
The next step is to create a Twitter application on Twitter. Go to http://dev.twitter.com and login with your Twitter account. Once you’ve logged in, go to your user account (your user name in the top right corner) and click on “My Applications”. You can create a new application by clicking on “Create a new application”. Give it a name (which will need to be unique among all Twitter applications, so you might want to use your initials in the name), a description, and a website. This website can be a temporary placeholder for now; it doesn’t have to really exist. If you have a web site up and running, you can go ahead and create a folder there to use as the temporary URL. If you’re planning on running this app on your web site at some point, you can use the eventual URL you’ll use for the app.
That’s all you need! Agree to the rules, and click “Create your Twitter application”. (At some point, it’s a good idea to read through all the rules and make sure you really agree, of course).
Once you’ve created an application, you’ll need to get your consumer and user secret tokens for the application. Do NOT share these with anyone! These are private and need to be protected (if someone else gets a hold of them, they can use them to hack your Twitter account, and violate the Twitter rules, which might get you kicked off Twitter, so keep them safe!!).
To get these, click on the “Details” tab of your application and look for these items: Consumer key, Consumer secret, Access token, Access token secret. Create a new file in the same directory where you saved the tmhOAuth folder, and add:
<?php
$consumer_key = 'YOUR CONSUMER KEY';
$consumer_secret = 'YOUR CONSUMER SECRET';
$user_token = 'YOUR ACCESS TOKEN';
$user_secret = 'YOUR ACCESS TOKEN SECRET';
?>
Replace the text, “YOUR CONSUMER KEY” etc. with the data you get for these keys from your Twitter application and save the file as app_tokens.php.
The PHP
Now let’s create the proxy! This is a PHP program that will take requests from your JavaScript code, create an authenticated request to send to Twitter, process the results, and pass them back to your JavaScript. Here’s the PHP:
<?php
require 'app_tokens.php';
require 'tmhOAuth-master/tmhOAuth.php';
$query = htmlspecialchars($_GET['query']);
if (empty($query)) {
    $query = "html5";
}
$connection = new tmhOAuth(array(
    'consumer_key' => $consumer_key,
    'consumer_secret' => $consumer_secret,
    'user_token' => $user_token,
    'user_secret' => $user_secret
));
// Get the timeline with the Twitter API
$http_code = $connection->request('GET',
    $connection->url('1.1/search/tweets'),
    array('q' => $query, 'count' => 10, 'lang' => 'en'));
// Request was successful
if ($http_code == 200) {
    // Extract the tweets from the API response
    $response = json_decode($connection->response['response'],true);
    $tweet_data = $response['statuses'];

    // Accumulate tweets from results
    $tweet_stream = '[';
    foreach ($tweet_data as $tweet) {
        // Add this tweet's text to the results
        $tweet_stream .= ' { "tweet": ' . json_encode($tweet['text']) . ' },';
    }
    $tweet_stream = substr($tweet_stream, 0, -1);
    $tweet_stream .= ']';
    // Send the tweets back to the Ajax request
    print $tweet_stream;
}
// Handle errors from API request
else {
    if ($http_code == 429) {
        print 'Error: Twitter API rate limit reached';
    }
    else {
        print 'Error: Twitter was not able to process that request';
    }
}
?>
Save the file as search.php. Notice that I’m linking to the tmhOAuth library by requiring tmhOAuth-master/tmhOAuth.php which means the tmhOAuth-master folder must be at the same level as search.php. I’m also linking to app_tokens.php, so again, this file should be at the same level as search.php.
So, what this code does is to create a request for Twitter using the secret keys you added to app_tokens.php, and then makes the request to the Twitter REST API (version 1.1). We’re using the search API, but there are many other types of requests you can make too, like to get a user’s timeline or the Twitter home timeline, and many more.
We’re accepting a “query” parameter in the URL (and you’ll see how we can pass that to the PHP script from our JavaScript shortly), which acts as the search query. This also gets sent as part of the request to Twitter, so the tweets you get back will match that search query. We’re requesting 10 tweets, but you can request more if you want (although there is a limit, so don’t request too many).
If the request is successful, then the status returned from the request will be 200 (that means everything is okay), so we can extract the tweets from the response. Twitter sends copious information about all the tweets (you can see an example response here), so for this example we’re just pulling out the tweet text and ignoring the rest of the data. We’re putting all the tweets into a JSON array, and “printing” this array which sends the data back to your JavaScript code.
You can test this PHP script from the command line: bring up a terminal window, and navigate to the directory where your search.php script is located, and type:
php search.php
If it’s working correctly, you’ll see the results of a search for “html5” displayed in the terminal window. If you’ve made an error in the code you’ll see the error message and hopefully you can fix it.
The JavaScript
Finally! It’s time to write your JavaScript code and make a web page. We’ll keep the web page super simple:
<!doctype html>
<html>
<head>
<title>Twitter</title>
<meta charset="utf-8">
<script>
// Your JavaScript code will go here
</script>
</head>
<body>
<form>
    Query: <input type="text" id="query">
    <input type="button" id="submit" value="Get Tweets">
</form>
<div id="error"></div>
<ul></ul>
</body>
</html>
Save this HTML as search.html in the same directory and at the same level as search.php. This web page simply has a form input where you can input the search term you want to use, and an empty “error” <div> in case we get an error (so we can display an error message), and an empty list where we’ll add the tweets if everything goes well.
Now, let’s add the JavaScript:
window.onload = function() {
    // set up the click handler for the form button
    var button = document.getElementById("submit");
    button.onclick = getTweets;
}

// when you click "Get Tweets" we call this function
function getTweets() {
    // set up a new XHR request
    var xhr = new XMLHttpRequest();
    // we're calling search.php and passing in a query string
    var url = "search.php?query=";
    var query = document.getElementById("query").value;
    if (!query) {
        query = "html5";
    }
    // we encode the query to handle any special characters properly
    url += encodeURIComponent(query);

    // this is the function that is called when the XHR request
    // to our search.php script is handled, and a response sent back
    xhr.onload = function() {
        // if everything went okay, then send the response data
        // to the displayTweets() function
        if (xhr.status == 200) {
            displayTweets(xhr.responseText);
        } else {
            var errorDiv = document.getElementById("error");
            errorDiv.innerHTML = "Error getting tweets: " + xhr.status;
        }
    };
    // make the request!
    xhr.open("GET", url);
    xhr.send(null);
}

function displayTweets(tweets) {
    // tweets is a big long string, so we need to parse it
    // into JSON first
    tweets = JSON.parse(tweets);
    var ul = document.querySelector("ul");
    // clear existing tweets from list
    while (ul.hasChildNodes()) {
        ul.removeChild(ul.lastChild);
    }
    // add new tweets
    for (var i = 0; i < tweets.length; i++) {
        var li = document.createElement("li");
        li.innerHTML = tweets[i].tweet;
        ul.appendChild(li);
    }
}
Make sure you add this JavaScript into the <script> element at the top of the search.html HTML file you just created.
When you enter a search term into the form and click the “Get Tweets” button, the getTweets() function is called. This function sets up the URL for the XHR request, and also sets up the XHR object with a callback function. We’re getting the search query from the form, and adding it to the URL for the XHR request. We send the request and if all goes okay, we call the displayTweets() function, passing in the response text from the XHR request.
In displayTweets() we first call the JSON.parse() method to parse the tweets string (this string is stringified JSON data), so we have to parse it to get the object from the JSON). Then we can loop through all the tweets in the array, and get each tweet from the array. If you want to see what the tweets data looks like, just add the line:
console.log(tweets);
below where we call JSON.parse().
And for each tweet, we simply create a new <li> element, add the tweet text as its content, and append it to the <ul> element in the page.
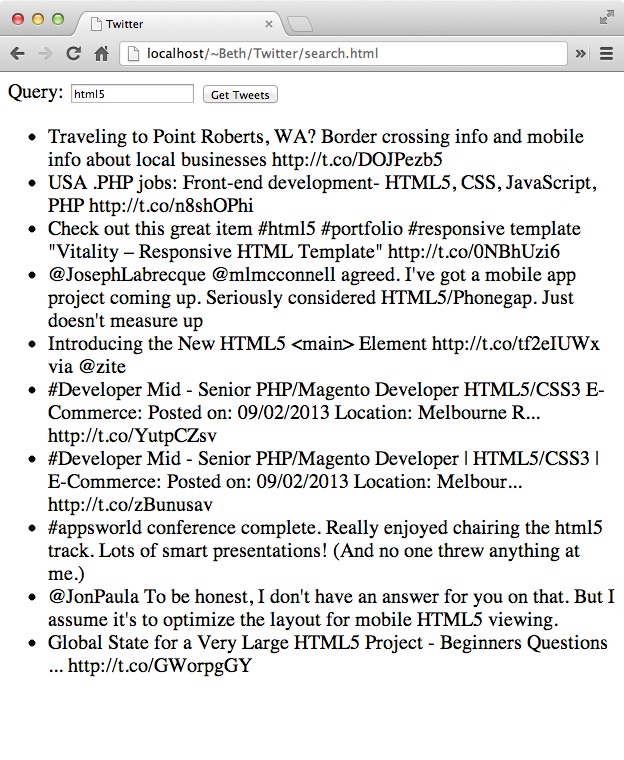
Here’s what you should see (with different tweets of course):
That’s it! Clearly, this is much more complex than our original code to use JSONP to request tweets directly from Twitter via JavaScript, but with the new API in effect, there’s just no way around it. If you want to use this script to update the example in Chapter 7, you add the JavaScript code to make the request to search.php to tweetshirt.js, change the call to displayTweets() to updateTweets() and modify the updateTweets() function so you parse the JSON in tweets before processing it. You’ll also need to remove the JSONP script at the bottom of index.html (since that request no longer works).
For more information
If you haven’t already, check out Chapter 6 of Head First HTML5 Programming which explains in detail how XHR works. In that chapter we talk about the security requirement that your JavaScript must make a request to a server script that’s running on the same server. As you’ve seen, in this example, that’s exactly what we’re doing! Your PHP script is the server script, and you’re making a request to it from your JavaScript. It’s the PHP script that makes the request to Twitter, and this PHP script doesn’t have the same security requirement as your JavaScript does, so the request works.
I based the code for this example on the sample code by Adam Green (with a few modifications). Adam also has two free eBooks available that describe how to use tmhOAuth, and shows additional examples of how to use the API, and how to write jQuery code to use the PHP scripts.

Nice addendum to the information in HTML5 Programming.
Thanks AJ, this is a ugly one for us book writers…
I am unable to connect to twiiter via search.php. I am using wamp server and have lan proxies to connect over internet.. When I echoed the $http_code in the seach.php file it is echoing the value as 0. Please help me to fix the problem.
Thanks for the update
Aj Aj Ajey… Hey yavrum hey….
AJ.. AJ.. AJEY.. Hey Yavrum Hey..
my php search.php is working but giving ” PHP Notice: Undefined index: query in /var/www/tweeter/search.php on line 4
” But tweets are not comming it is giving error .
Error getting tweets: 500
please help
Thanks, I am seeing some daylight now. I experimented with replacing Twitter with Google Docs Spreadsheet as a way to get text into my canvas via json, but got lost in the weeds there too. I think I will return to that approach once I get more skilled. That seems like a good stack for proto typing new json api applications, and might be more headfirst friendly.